
So, your Android app is built, polished, and ready to take over the market. Next up is you publishing it on Google Play Store — an undertaking that may seem daunting at first. We get it: if you do it wrong, your app may never see the light of the day. But we've got you. Today, we will guide you through a smooth launch on the Google Play Store, which is undoubtedly the leader in the number of published apps and users, with over 2.4 million apps.
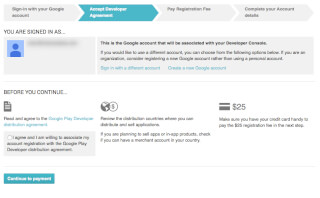
Before diving into the specifics of publishing your app, let's make sure you have all the essentials in place. Creating a Google Developer account is something you can do at the beginning of the app development process. Without a Google Play Store account, you can't publish your app on the Play Market.
You can use any of your current Google accounts or create another one to sign up for a Google Developer Account. It doesn't matter whether it's a personal or corporate account. You may easily transfer your app to another one down the line if needed.
Signing up for a Google Developer account is easy. All you have to do is to:
Keep in mind that developers with personal developer accounts must meet certain app testing requirements before they can distribute their app on Google Play. Also, since 2024, developers with new personal accounts need to verify access to a real Android device using the Play Console mobile app.
Usually, it takes no more than two days to get approval from Google. Don't worry if you forget to add some information. You can edit your account later.
If you plan to sell paid apps or in-app purchases, you have to create a Google Merchant Account. A Google Merchant Account will help you manage app sales and your monthly payouts, as well as analyze sales reports.
Once you finish creating the Merchant profile, the developer account gets automatically linked to it.
Based on our experience, we highly recommend starting to prepare the End User License Agreement (EULA) and Privacy Policy in advance.
You can take the documents from similar apps as references and create your own based on them, or ask a lawyer to make everything from scratch.
EULA is an agreement between a product owner and a user of the product. In brief, it contains:
While Google Play doesn't require you to have a Terms of Use document for your app, it's a highly recommended practice. Terms of Use or Terms and Conditions explain how users can interact with your app and what to expect. You can combine Privacy Policy and Terms of Use into a single document, with separate chapters for each.
Make sure to include the following information in the Privacy Policy:
By this time, you must have a well-defined understanding of your product concept. Now you need to make sure that all the planned features comply with the Google Developer Policies. These documents explain how mobile apps need to be developed, updated, and promoted to support the store's high-quality standards. Making sure your app doesn't violate any of the policies is one of the crucial steps to publish successfully.
If Google decides that your product violates some policy chapters, your app may get rejected, blocked, or even deleted from Google Play. Besides, numerous and repetitive violations may lead to account termination.
So study all the available information about:
Google is constantly refreshing its policies, so it's important to monitor the changes even after your Android app is released.
You went through the development process, endless testing, and bug fixing, and finally, the “X-day” comes. Before moving on to the upload process, you need to check the following things:
The package name should be suitable over the life of your application. You cannot change it after the distribution. You can set the package name in the application's manifest file.
Every application should be digitally signed with a developer's certificate. The certificate is used to identify the author of an app and can’t be generated again.
Google imposes file size limits for uploads, allowing up to 100MB for Android 2.3 and higher (API level 9-10, 14 and above) and 50MB for earlier Android versions.
If your app exceeds this limit, you can always switch to APK Expansion Files.
Google accepts two release formats, including app bundles and .apk. However, .aab is a more preferred option. To use this format, you need to enroll in app signing by Google Play.
You may learn more about app file technical requirements in the Developer Documents, Prepare for the release guide.
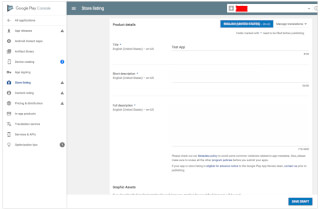
When you have the file lined up, you need to create a brand new app listing in your Developer Account. Here's how to do it:
After this, you will be directed to the store listing page, where you can add all the details about your mobile app.
Your app listing contains the information needed for app store optimization (ASO) and gives users more insights into your app before downloading. The mandatory sections are marked with *.
You may need input from a designer and a copywriter, so it's better to start preparing the following materials in advance.
It contains a title of your app (up to 50 symbols), a brief description (up to 80 symbols), and a full description (up to 4000 symbols). But remember, avoid keyword stuffing. Focus on writing naturally and engagingly, and the right keywords will find their way in.
You may add from 2 to 8 screenshots. Choose the ones that highlight the app's functionality and its unique value.
The requirements are the following:
- JPEG or 24-bit PNG (no alpha)
- from 320px to 3840 px
- the ratio of the long side to the short side should not be more than 2:1

The requirements are the following:
- 32-bit PNG (with alpha)
- Maximum file size: 1024KB
It is an optional marketing tool displayed in various places on Google Play, including the homepage.
The requirements are the following:
- JPEG or 24-bit PNG (no alpha)
If you have any promo videos, you may add a link to your YouTube channel directly in the app listing. This video will be displayed at the top of your app's page.
Unlike some app stores, Google Play doesn't allow custom keywords. When creating your app listing, you'll be able to choose from a predefined list of relevant keywords. Here's the trick: selecting the most accurate keywords will significantly boost your App Store Optimization (ASO) and help users discover your app.
If your app supports several languages, you can add translations for your app's Store Listing page, APK files, strings or in-app products. It's highly recommended to include localized screenshots and images.
Through the drop-down menu, select your application type: game or app. Then pick the category that best fits your app's genre or purpose. You can also add a section to rate your content after uploading the APK to the Google Play store.
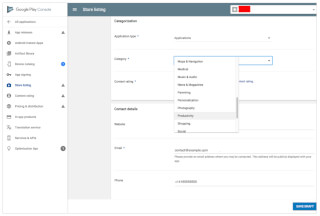
Here, you should provide the support service contacts. By filling in the website URL, email, and phone, you make it easier for the users to contact you if necessary.
Google requires you to add a link to the Privacy Policy that we mentioned above.
While editing the Store Listing, you can take a break at any moment, click Save Draft, and complete this stage later.
To ensure your app is visible on Google Play and avoid potential removal, you'll need to complete a Content Rating questionnaire. You can easily find this section on the left-side menu.
You must provide accurate information for the questionnaire as any misrepresentation of your app's content might lead to suspension or removal of the Google Play account.
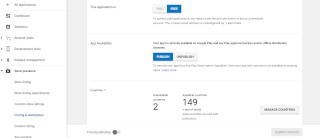
In the Pricing and distribution section, you need to fill in the following information:
Remember that you can change your paid app to a free one later, but a free app cannot be changed to a paid one. If you decide later that you want to distribute the app for money, you'll have to create another app with a new package name.
Finally, you are ready to upload your Android app file. Head over to the App Releases section on the left panel. Here, you will find three options for publishing the app: Production, Beta and Alpha tracks.
We highly recommend starting with the Alpha or Beta versions. In this case, after passing the review process, your app will not be available to everyone on the Google Play store.
The Alpha version assumes testing in a closed environment where you can invite a trusted group of testers. With Beta testing, anyone can sign up to be a tester and send feedback to you after giving your app a test drive.
Pre-release testing allows you to gather people's opinions, test your app with a broader audience, and fix issues before making the app public.
Note that if you decide to change the Alpha or Beta version to the Production type, it will take time to go through another review round.
Once you choose the type of release, follow the steps:
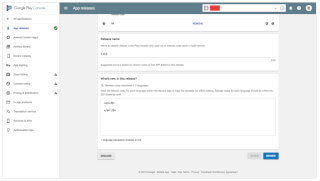
The release name will be added automatically. For the first time, you may delete the text from the What’s new in this release field.
Don't stress over missing crucial details. Google Play offers helpful instructions and tips throughout the publishing process. Plus, the system won't let you submit your app for review if there are any critical missing pieces.
Remember that with the very first version, there is no opportunity to set manual publishing. The app will be released right after it passes the review. Usually, it takes up to 2 days. Google says the review process could take up to 7 days or even longer in exceptional cases.
Once the app is reviewed, you'll receive a notification on Google Console Dashboard.
We hope this guide will help you get the publishing process right and put your amazing mobile product in front of Google Play Store users. But remember that the journey does not stop after publishing. Making your mobile application a long-term success requires an ongoing effort from your development team. Prompt troubleshooting, constant updates, and new releases will keep your app thriving in the long run.
Orangesoft's team can help you keep a watchful eye on your app's performance post-release and continuously refine it based on user feedback. Let's pool our efforts to help your app take flight.
This article was originally published on GoodFirms